We are technically active bunch of students who can code, design , create solutions, use technology to innovate & make life easier.

Friday 25 August 2017

Image result for battle of the brains
PARAM organised another event on 25th August 2017, Friday.
This was a re-event to finally have our winner as nobody won the previous battle.
This event consisted of the following rounds:

ROUND 1: ONLINE APTITUDE TEST
·         Website https://www.indiabix.com
·         Number of question: 20
·         Duration of test: 30 minutes
·         50% students were eliminated after this round

ROUND 2: ERROR DETECTION
·         3 C codes were shown on the screen, each having 10 errors. 10 minutes for each code were given.
·         The top 3 students who found maximum errors, went to the next round.
·         We had more than 3 participants who got selected for the next round, so another code was shown for 5 minutes to the selected students and finally 3 students were selected.

ROUND 3: WORD SEARCH (CROSSWORD PUZZLE)
·         We had 3 phones arranged. Each phone had the application: Word Search (Crossword Puzzle) downloaded and working.
·         Category Chosen: Technology
·         Number of levels to cross: 22
·         Time given: 10 minutes
·         Whichever participant solved the maximum puzzles in the given time, was going to win this battle.

·         If there was a tie, another 5 minutes would have been given to those participants as a tie breaker session. Whoever solved the maximum puzzles in those 5 minutes, would have won.

      The tie breaker wasn't needed in this event for the last round. We had a clear winner solving 5 puzzles in 10 minutes.
      Reetika Singh from Third Year, CS.
      We congratulate her on behalf of the entire department. She is awarded with 500 INR.

      Team PARAM

Wednesday 9 August 2017

PARAM - The Computer Society of MGM; recently organized an event inspired by the theme of our favorite television show "F.R.I.E.N.D.S". 

It was a mixture of 'Entertainment and Technology' .
This event consisted of three rounds testing every participant's general knowledge, listening skills, reading skills and analytical skills. Winning relied upon how quick could participants react to the scenarios we put them in.The rounds were as follows:

Round 1: Beat the clock! (This round had quiz. Containing all the aptitude questions, out of the box thinking questions etc. 2 teams from this round were taken further.)
The complete mass was divided into four teams. Two teams were seated in each room. Battle of the brains begun. A series of questions were given to each team. Whichever team answered the most questions was selected for the next round. One minute time was given for each question.

Round 2: Brain x Body! (The 2 teams that were selected here, were further divided into 4 sub-groups and they were engaged in some kind of activity, along with which they had to answer to our questions. 4 winners were selected from this round.)
In this round we divided four groups of eight students each. We gave them a COSCO ball which had to continuously pass from one person to another without dropping. If any participant dropped it, s/he was eliminated on the spot.
While this was going on we asked them FAST THINKING QUESTIONS which were supposed to be answered within 10 seconds. Whoever answered the maximum questions in each group and did not drop the ball, was taken further in the next round.

Round 3: BAMBOOZLED! (4 winners from the second round played BAMBOOZLED and one final winner was selected.)
We altered the rules of original BAMBOOZLED to make it easier for our participants to understand.
Our BAMBOOZLED was played in a ladder of 6 steps. The first 3 steps were played as a pair. It included two activities:
                    a. Guessing a word by giving three phrases.
                         (This was done once by each partner. Making it a                                two step activity.)
                    b. Dumb Charades
The last three steps of the ladder were played by the pair that won the previous step, but against each other.
The 4th ladder included quiz, which had a twist of "spin the wheel". Spin the wheel was a neutral call for every participant who gave a correct or a wrong answer after dabbing for the question. If the dabber gave the correct answer s/he could pass the wheel to the other participant or keep the chance to themselves. If the dabber gave a wrong answer, s/he had to spin the wheel themselves. The wheel had 40% positive points, 40% activity and 20% negative points bifurcated as follows:
1: (+1)
2: (Activity)
3:(+3)
4: (Activity)
5: (-5)
6: (+6)
7: (Activity)
8: (+8)
9:  (Activity)
10: (-10)
The 5th ladder included, a set of 10 questions based on a video that was played on the spot.
And finally, the 6th ladder was the CIPHER TEST.

Details of Event:

Held On: 3rd August, 2017, Thursday 
Entry fees: 50 INR

THE EVENT WAS ONLY INSPIRED BY F.R.I.E.N.D.S, IT WAS NOT BASED ON IT. SO ANYBODY WHO HADN'T WATCHED THE SERIES WAS NO DIFFERENT FROM THE ONES WHO HAD.
          
This event was inspired by the following episodes of F.R.I.E.N.D.S

Team PARAM

Tuesday 13 June 2017


Psycode - Tech It to The Future


 PARAM is pleased to announce the launch of our Society technical magazine!

Psycode - Tech It to The Future is an initiative by our PARAM Society and as you can see the final result is here Psycode 1.0 (2016-2017). It would have not been possible without the hard work, contribution and dedication of all the team members. Thanks for all your support without our followers this work would not have been possible. A special thanks to our PARAM coordinator and the whole computer science department for giving us this opportunity.

In our continuing efforts to go green and reduce paper wastage, we would appreciate greatly if you write us to our email to give your opinion about this initiative. We hope you continue to enjoy and benefit from this publication. Stay tuned as we work to bring you more exciting and refreshing content in the months to come!

Either you can read it below or click this link to open/download this magazine. Psycode


We hope you will enjoy our magazine and all the technology related stuff. If you have any questions, comments or suggestion please send them our way.


Sunday 7 May 2017

LAN Gaming Event Poster - PARAM MGM COET

The most anticipated event is here! Yeah a 3 hr non-stop gaming event. LAN GAMING

LAN Gaming basically consists of two sub gaming events one consists of single player games and another one have a multi-player team game. Choose wisely whether you are a lone warrior or a team player. You can only register for any one of the sub-event given below. For both the sub events the rules and the other details for each game is given below. This event held on 13 April 2017 at MGM College of Engineering and Technology for college students.

Lone Warrior

Let the adrenaline pump through your blood!!
Get ready to test your racing skills in Need For Speed and keep your opponents down with K.O in Tekken.

Need for Speed logo - PARAM MGM COET


NFS is racing game in which you have to beat all other players to win.


Tekken logo - PARAM MGM COET


Tekken is a one-on-one duel fight in which you have to beat only one opponent per match. 


Both the games are single player games and only one person can register either in any one of the game or both.


Team Player

Are you ready to showcase your shooting and snipping skills in Counter Strike?
So get ready assemble your team and register here. Time is running!!

Counter Strike logo - PARAM MGM COET

Counter Strike is a FPS multiplayer game with 4 members in each team. The team which remain unbeatable will be the winner. The number of team members and rules can be changed if required.

Interested students can take part in this one on one team match.


Winners got exciting cash prizes in each of the games after competing and winning in multiple rounds.

Note- This event is over kindly wait for next session.

Sunday 12 March 2017


Bluetooth 5 and other Bluetooth versions are managed by BLUETOOTH SIG abbreviated from Bluetooth Special Interest Group. Which has around 30,000 member companies of various fields.

BLUETOOTH SIG's part, aimed at simplifying our marketing, communicating user benefits more effectively thus making it easier to signal significant technology updates to the market.

Officially, Bluetooth 5 is officially unveiled during a media event in London on 16 June 2016. 

Now, allowing internet of things features embedded in it, making world  more easier to connect and more user friendly. Also, supports transfers at 2 Megabit per second instead of the usual 1 Megabit per second.


It will provide 800% increase in broadcast messaging capacity, as well as "coexistence" with other connectivity technologies like wi-fi and 4G/LTE for "more robust connections". 

Bluetooth 5 boosts location services that is providing location based services and convey much more information to other compatible devices without forming an actual connection which includes enhancements to lower battery consumption.

Thus, Bluetooth 5 devices are supposed to be available in market by mid of 2017.

Let us know if you find this short update useful 😊.


Written by
Prince Hridayalankar


Check out one more article by him - Super Wifi

Friday 25 November 2016

Microsoft Student Partner - PARAM MGM

Microsoft Student Partners (MSPs) are the technology enthusiasts who loves to build communities in their University/College and share their experience and knowledge with their colleagues.

What is Microsoft Student Partners Program ?

The Microsoft Student Partners Program is an annual award program spanning over 100 countries around the world, thousands of Microsoft Student Partners (MSPs) share their deep knowledge and passion for technology with their fellow students. They master the latest technical content provided by Microsoft Imagine and share what they learn, building leadership and communication skills along with technical expertise.


Major Benefits -

Leadership Skills : Hosting workshops, events and demos on college to build community of students.

Build Resume : Working with Microsoft professionals, one can enhance their technical skills and all this you can have it on your CV (Resume).

Exclusive Access : Join exclusive Microsoft training events to expertise your carrier skills and access to latest technology events.


Who can apply for MSP Program ?

Yes, you are eligible for MSP candidate under following criteria :
- Must be 18 + years old.
- Full time Bachelor/Master related degree or recognized course from any reputed College/University..
- Passionate about technology and share them with their College/University community.


Microsoft Student Partners do incredible thing like - Reference
  • Discover and try latest Microsoft technologies - Be the first to try Microsoft products before even getting released which is quite amazing and learn all the special feature and specs of the next Microsoft technologies. Remember the more you know about stuff around you, the more innovative you get.
  • Learn new coding languages - As Microsoft Student Partner you’ll learn how to develop Windows Phone and Windows 8, 8.1 or 10 application using C#, XNA, UWP basics and many more. This program will be a kind of proof on how much effort you put on your knowledge.
  • Develop applications for Windows Phone and Windows 8, 8.1 or 10 - So now that you’ve learned C#, you’re able to develop Windows Phone and Windows applications. I’m sure you’re wondering “Why should I develop apps for Windows Phone and not for Android or iOS?” Well think about it like this: There are a lot of apps on iOS and Android. So the competition will be harder if you release an app there. On the other side, the Microsoft Marketplace is new so there will be less competition. For instance, there are many popular games that can’t be found on Windows Phone like “Clash of Clans” or “Candy Crush”. So why not create something similar to them on the marketplace? You can make a lot of money from it and it’s really nice to say on your CV that your app is one of the top apps on the marketplace.
  • Meet international Microsoft employees and Student Partners - You’ll meet people that are important at Microsoft such as the DPE Lead, Country Manager, Technical Evangelists, MEA Technical Audience Marketing Director at Microsoft and many more. It’s really nice of getting a feedback from professional people as this will give you an idea of how people work at Microsoft and how good it is from the inside. Also you’ll meet other student partners around the world.
  • Benefit from an internship at Microsoft or one of its partners - If you have a dream of working for Microsoft well it’s a chance to prove yourself! The Microsoft Student Partner program gives the opportunity for students to work at Microsoft or one of its partners. This is very beneficial in the future since Microsoft is sending you to its partners. It’s a sort of recommendation you’re getting that you have what it takes to develop and help in building applications on the store.
  • Represent Microsoft at your University/College - Now this is the important part of being a Microsoft Student Partner. The moment you join the program you’ll become an ambassador for Microsoft at your university/college. What does an ambassador do? Well he mainly represents Microsoft, introduce students to the new technologies and finally hold seminars and development sessions. So this shows that you have leadership experience and could help you if you’re applying for any management position.
  • Give Seminars and improve your presentation skills - One of the skills you’ll get when you join the program is enhancing your presentation skills. As mentioned before you’re becoming an ambassador. You’ll be giving presentations and seminars at your university/college. So if one of your biggest fears is of standing in front of an audience, now is the chance to overcome it. Don’t forget during your career you are going to give presentations and deliver your ideas in a clear and straight manner.
  • Get Microsoft products for free on MSDN - The moment you join the program you’ll be evaluated on your performance during the year. If you dedicate yourself to the program you’ll receive some valuable prize such as MSDN. For those who don’t know, MSDN provides you with all Microsoft products available on the market along with 5 product keys for each.
  • Have it on your CV - The moment you graduate from university you’ll start applying for jobs. Fine, but what differentiate two students having the same GPA with an empty CV? Putting in your CV that you were in the Microsoft Student Partner program will show the company you’re applying to that you’re dedicated, passionate, ambitious and willing to learn new things. So this is a huge plus on your CV!

Microsoft Student Partner - PARAM MGM


How to apply -

For complete detail of the above activities, rules and regulations visit - MSP

For becoming an MSP you need to register for Microsoft DreamSpark to verify your eligibility as a student.
Note:- DreamSpark was renamed to Microsoft Imagine. According to Microsoft as a DreamSpark student or participant in the Imagine Cup, this is a critical program change.
Microsoft Imagine Link - Microsoft Imagine

Since we are the only technical society in our college to promote Microsoft's new technologies and services and it is our duty to encourage students to participate and be a part of the largest Microsoft Student Community. Our members will provide guidance and assist you to complete your enrollment in this program.

For more details about this MSP Program you can contact any team member of PARAM Society or you can send us your query regarding the release date and selection process to our email or by filling the contact form at the bottom.

Disclaimer - The above provided information may change at any time and Microsoft holds all the rights related this student program.


Regards
Team PARAM

Monday 31 October 2016

Github Banner Param Blog


Working in a team of people who are assigned and responsible for the same kind of role can lead to many conflicts. Take an example of an enthusiastic team of coders for an instance. They are all contributing to the same project by adding new feature and thus editing the same project’s file. Even for a single person working in a big project, it gets really complicated very fast and it becomes very difficult to keep track of all the changes made so far. For a large team it is simply not feasible. This is where “Version Control Software (VCS)” comes into the role and saves the day.

Today we will dig into the open source version control software: “Git” and have a little insight into its design as well as its importance. In last we will cover some basic and frequently used git commands.


What is a Version Control system?

But before jumping directly into the concept of git, I would like to talk little bit about “version control” itself. Version control is basically a system which keeps track of all the records corresponding to the changes made against the set files over a period of time. It allows you to revert a set of files or even the entire project back to a certain safe state, compare changes over time, see last modified change, track back the bugs or issues and even more. VCS reduces human overhead on tracking files as it is done automatically. Thus with VCS, we can modify, experiment, implement new features in project, without fear of losing the integrity of working project.

VCS system can be mainly characterized as either centralized or distributed. In Centralized Version Control System (CVCS), there is a main server that contains the repository of all the versioned files and any client can access the files from this central place. However, this type of setup has many disadvantages. Every node is connected to same main server. Failure of the server halts the system and thus makes it impossible for anyone to collaborate or even save the versioned change done by them.

To avoid problems of CVCS, Distributed Version Control System (DVCS) was introduced. In this kind of setup, the client mirror(or clone) the full fledged snapshots of the repository to its own local system.Thus every client has full record of all changes made in the project. Even if a node fails, it will not halt the whole system as every clone has full backup of all data. Git falls under DVCS. It enables many cool feature which we will later study.

Git was created by Linus Torvalds in 2005 for development of Linux kernel along with some other developers at initial stage. Git supports most of the major operating systems including OS X, Microsoft Windows and of course Linux as well.


Diving into Git

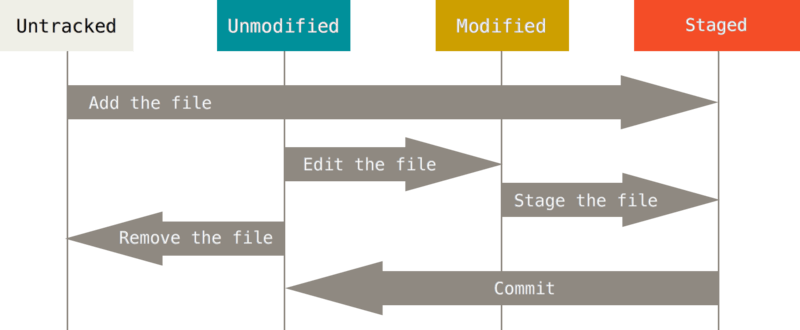
Let us try to understand git in the detail. Git stores all the tracking data for files stored in a git repository. For turning a project in git repository, first we initialize it inside the project’s working directory and add files that needed to be tracked. Files present in this directory can be sub categorized as either being tracked or un-tracked. We can change between the two using “git add” and “git rm” respectively. Git only sees the tracked files.

According to git, the tracked files lies in three states i.e., unmodified, modified and staged. At initial stage, all the tracked files lies in unmodified state. When we make some changes(or edit) in any tracked file, it changes its state to modified state. Before committing the tracked file, we need to add the given file into the staged state. Now If we commit the staged file, the current snapshot of the contents of your work tree at current moment is created and saved. Git stores a commit object which contains a pointer to the snapshot. Every time you commit your project, it takes whole picture of all your tracked files at current moment and store reference to that snapshot. If file is unmodified, Git simply link it to its previous identical version of the snapshot it had stored. These snapshot helps in implementing concept of version control. Git thinks about its data more like a stream of snapshots. Thus we can easily check the differences (i.e., changes) between different snapshots as well as between the currently staged files and any snapshot. This help in analyzing the changes made in the new version and gives the relevant picture. Don’t worry we will later dig further on how to exactly do it.


The lifecycle of the status of your files PARAM Blog
Figure 1. The life cycle of the status of your files. [Reference]


In git terminology, we refer to staging area as ‘index’, other two states (i.e., unmodified and modified) to be in ‘working tree’(i.e., files that you are currently working on) and all the previous snapshots created by commit command to be in ‘history’.

Git basic walk-through PARAM Blog
Figure 4. Git basic walk-through [Reference]

Now let us understand the concept of ‘branching’ which is considered to be an essential feature of VCS. Suppose you are working on a given project. Suddenly you realize you have to add a new feature (or resolve a bug) in your project. But you can not afford to risk the current progress of the project by adding experimental code which can easily mess up logic of whole project. One thing you can do is create a copy of same project at current state and make changes to it. If the changes are successful then make it the main (or master) project. However, consider the case where many people are working together adding different new features (or resolving different bugs) then multiple copies will generated and keeping track of all these copies is simply not feasible. We need a system which does not create multiple copies; were multiple people (or a single user) can take the snapshot of current state; work on it at different branch and later when they are happy with changes made; they can easily merge the changes into the main (or master) project. This is what exactly branching helps in achieving.

For getting an insight on how branching is done by git, we have to understand how git stores stream of snapshot and keep records of commit objects (i.e., metadata generated after every commit). It can be easily understood by taking help of diagram given below. Here we have a working directory. Whenever you commit the staged file (i.e., index), it is provided with an unique identification (i.e., id) number which gets generated via SHA-1 hash function. commit object (i.e., metadata about commit) gets this id number. All the commit object points to their parent node and so on. The current branch in working tree is identified by the pointer named HEAD. Main branch is identified by the pointer named MASTER. MASTER points to the last commit object in the master branch. According to this diagram, if we will generate a new commit object, it will get add after last commit object (i.e., ed489). Therefore, MASTER and HEAD will then point to this new commit object. Here if we have another branch (namely, maint), we can access it by referencing HEAD pointer to its position. If we generate new commit object in the branch ‘maint’, we will end up having two sub tree and two child nodes sharing a common parent node(i.e., a47c3). Thus our given project will progress in two different dimensions.


Internal structure of git records PARAM Blog
Figure 2. Internal structure of git records [Reference]


Now, after some time if we want to combine the two sub-trees into one. We can do that by using “merge” operation as shown in figure below. According to given diagram, we were present(i.e., checking-out) ‘maint’ branch and performed “merge master” operation. Merge operation creates a new merge-commit. It is used for documenting all the merges in the repository. In this diagram we have shown only simple type of merging technique which is called “fast-forward merge”. For in detail study of about git branching and merging algorithm follow this resource. [Reference]


Fast forward merge operation PARAM Blog
Figure 3. Fast forward merge operation [Reference]


Using Git

Now it’s time to get some hands-on git. First you must Install git and set the environment PATH for git in your operating system. [Reference]

After installation, first thing you do is set your user_name and email_id. These fields are mandatory as git uses these information every time you commit and it is immutably backed into the commit. Any other client can view these field in log file to identify who did what commit. Thus every commit object has three main metadata its id,  author_name (username and email id) and date (time-stamp when commit occurs). Now run following command in your console :

git config --global user.name "your_user_name" (enter)
git config --global user.email "your_email_id@example.com" (enter)

This will set your user name as “your_user_name” and email address as “your_email_id@example.com”. This much configuration is enough for you to get started. But for in detail configuration check out this resources. [Reference]

Now we shall cover the basic workflow and basic commands used step by step :

1. Initialize the git repository : After you have installed git in your system. First of all go to your working directory through your console. Note that all the commands that we will discuss later in this article are to be run on the console. Now it’s time to initialize git repository in your working directory. We can do this by following command :

git init (enter)

This will create an empty and hidden git repository or reinitialize an existing one. In this repository sub directories for head, object etc is created which helps git in tracking the progress. An initial HEAD pointer referencing master branch is also created.

2. Adding files into index : After you have initialized git repository, it is time to add files into tracked category. We can do this by following command :

git add [<file_name>] (enter)

This command can be used multiple time. It update the index by adding mentioned file from working directory. Thus it prepare staged content for the next commit which will get appended into historical snapshot. The git add command takes a path name for either a file or a directory. If it’s a directory, the command adds all the files present in that directory recursively.

3. Checking the working tree status : We can check the status of the tracked files by using following command :

git status (enter)

Above command also tells you branch you are on.

4. Record changes to repository : Now if we want to stores the current contents of the index for the snapshot hence create a new commit object. We can do that using following command :

git commit (enter)

Above command will open your default notepad where you can type your commit message. It is not mandatory but recommended as it is useful for quick reference for what the commit object was about. For changing the editor run the following command :

git config --global core.editor “<path/to/editor>(enter)

5. Checking changes between commits, commit and working tree : We can track the changes using running following commands :

For checking difference between your working directory and index :

git diff (enter)

For checking difference between a modified file (namely, file_name) and last committed node present in your local repository :

git diff HEAD [<file_name>] (enter)

For checking difference between staged files (i.e., index) and local repository files :

git diff --cached [<file_name>] (enter)

In output '+' represent line added and '-' represent line removed in your file.

6. Feature of branch : We can create a new branch using following command :

git branch [<branch_name>] (enter)

Above command will create a new branch namely ‘branch_name’ at current node. Now we can switch from current branch “master” (say) and to this new branch (namely, branch_name) by running following command :

git checkout [<branch_name>] (enter)

Above command will make HEAD pointer reference to this new branch thus changing the local branch. Now we can merge historical snapshot of the new branch (namely, branch_name) into the current branch (say, master) by running following command :

git merge [<branch_name>] (enter)

7. Viewing commit log : We can do this using following command :

git log (enter)

Above command is useful for tracing back the all the commits. It is metadata of commit object which contains author name, date and commit message.

I have only covered some of the very basic commands for getting you started. There is so much you can do and it is practically impossible to cover all of them in this article. I would recommend you to check out this resource for sharpening your skills. [Reference]

In the end, We can say git is “revision control” tool for managing your tracked file in your working directory. By far we have assumed that git repository is present in our own local system and thus can be accessed by a single user only. For team project, git repository can be hosted on remote server, and team members have their own local copy which they can modify and merge the changes back to remote. We can host the git repository in any server and there are many online platform available for hosting git repository like GitHub, GitLab, BitBucket etc.
The above code snippets are successfully tested on Mac OS X and Linux.

Other useful links:


Written by
Vertika


Know Us

We are technically active bunch of students who can code, design, create solutions, use technology to innovate & make life easier. For more visit our About Us page.

Our Team

  • Kritika Kataria (Head)
  • Kartik Sethi (Deputy Head)
  • Prince Haridayalankar
  • Akash Singh
  • Hema Yadav
  • More>

Contact Us

Name

Email *

Message *

Visitors